| Microsoft
Windows requires additional setup beyond the defaults that the installation utility will
provide. First, Service Pack 1 and the Service Pack
1 Update for Windows 95 should be installed unless you are running the OSR2 version of
Windows 95 or are running Windows 98/NT. For Windows NT, make sure you are running the
latest service pack available.
Second, you will need to retrieve and install the latest
version of the Client 32 from Novell. This may be downloaded from the Novell website at
http:\\support.novell.com. |
| Once the Novell
Client 32 has been installed, you will need to perform some additional configuration to
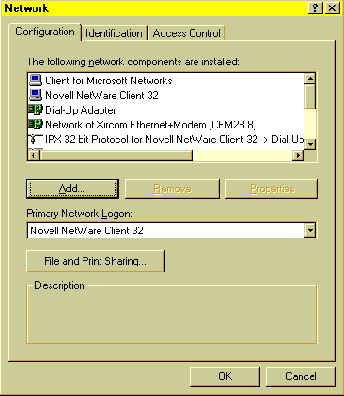
ensure that database integrity is maintained. First, display the Network Properties page
by right-clicking on the Network Neighborhood icon and selecting Properties. You should
see a box similar to that displayed to the right. Make sure the Primary Network Logon is
Novell Netware Client 32. Note: The illustrations are from Windows 95. If you are running
Windows NT, the options are somewhat different, but there are equivalent options
available. |

|

|
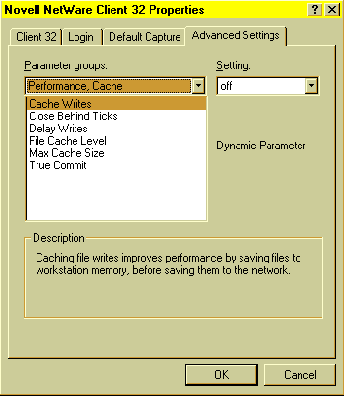
Next,
double-click on the Novell Netware Client 32 line, displaying the properties page for the
Netware client. This will look similar to the page at left. Click on the Advanced Settings
Tab, then on the Parameter Groups list box. Select Performance, Cache from the list that
is displayed. You must then set each of the Dynamic Parameters in this group according to
the following table.
Dynamic
Parameter |
Setting |
| Cache
Writes |
off |
| Close
Behind Ticks |
0 |
| Delay
Writes |
off |
| File Cache
Level |
0 |
| Max Cache
Size |
0 |
| True
Commit |
on |
|
| Once these
setting have been selected, click on OK to leave the Client 32 properties page, then OK to
leave the Network properties page. You will be prompted to restart the computer and this
should be done before continuing. When you next log in, you should receive a red NetWare
login screen, rather than the standard Windows login. |
 |
 |
Last, you will
need to create a shortcut on your desktop for Conductor™. Right-click on an empty
spot on the desktop and select New, Shortcut. In the dialog box, enter the name of the
batch file that has been set up on your network to run Conductor™ (normally
t:\AREV\AREV.BAT, where "t:" is the network drive letter where Conductor was
installed) and click OK. On the second page, enter Conductor for the name, then click on
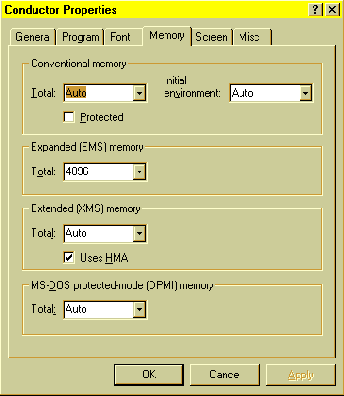
Finish. Then, right-click on the new shortcut and select Properties. Click on the Memory
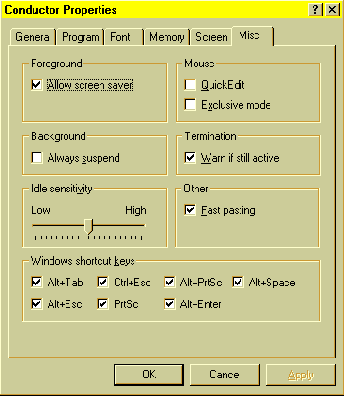
tab and set up the fields as displayed above. Click on the Misc tab and setup the values
as displayed in the example to the left. Last, click on the Program tab and select Change
Icon. Select the AREV.ICO icon file provided with Conductor™. This is normally
located in the t:\AREV directory, where "t:" is the drive where Conductor™
was installed. |


